Creating rain in your tank
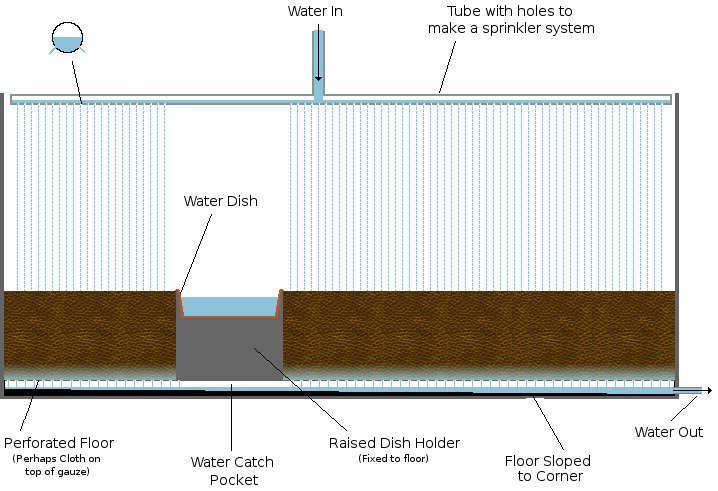
The following is an idea I have had to construct something that will rain in your tank without flooding it. (See Fig. 1)
I'm interested because rainforests are very humid, and in Africa there is torrential rain from time to time. I'd like to mimic their natural habitat as close as possible. You can buy misting devices quite cheaply (£15-25) but I have heard they break quickly and they don't have the added benefit of a good soaking. And there is still the drainage problem, which is all this idea really solves. The idea could be done with a fogger/mister instead of a pump. This idea will mean you can have much better ventilation in your tank because you don't have to try and trap the moisture as much. It'll keep the tank fresher and cleaner hopefully and I reckon the snails will love it. They'll probably need some cover like overturned plant pots so they can choose if they wish to get drenched.
It sounds more complicated than it is really. I think it'll be fairly easy to do, particularly on plastic tanks. And when it is done, the lid will still come off easily so it won't interfere with the daily routine
.Equipment
You will need the following:
- A cheap pump like you get on cheap, budget water-features. A more expensive pump will allow you to supply multiple snail tanks.
- A piece of nylon material that allows water through but not substrate. (You need a piece that won't get too clogged and that lets plenty of water through).
- A water container.
- A piece of stainless steel gauze or something similar to the size of your tank.
- Flexible plastic tubing.
- Rigid plastic tubing.
- 2 Plastic Water dishes.
- A plastic cylinder that your water dish rests in nicely.
- Plastic sheets, to construct the base for the gauze to sit on and to construct the slope needed to drain the water.
- Silicon sealant.
- 2 Stainless steel washers.
- 2 Rubber washers.
- 1 stainless steel tap fitting with screw ends.
- 1 nut.
- A glass drill bit.
That will cost about £10-25 if you don't already have some of the bits and depending on the size of the tank.
Instructions
Step 1
You construct a sloping base the size of the inside of your tank (preferably sloping to one corner but one end is ok) out of plastic sheets. (See Fig. 2)
It needs to hold the gauze and the weight of the soil on top, so you may need to make more supports around it or half way along.
This step is probably the hardest bit and needs making to be as exact a fit as possible as we want to be able to remove it from the tank and this means we can't seal it in place.
Step 2
Put the base inside your tank. At the end it slopes to use the glass drill to drill a hole through your tank and into the chamber that holds the water.
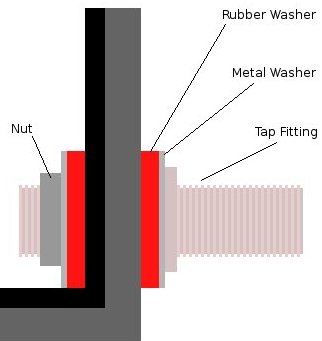
Step 3
Sand the hole and then add the fitting. (See Fig. 3) Then slide the hose over the external end and tie it on. This means the base is now water tight but can be undone for cleaning.
Step 4
Cut your gauze to the size of the inside of the tank.
Step 5
Silicon your plastic cylinder on to your gauze. The height of the cylinder must be equivalent to the depth you want your substrate to be, so saw any excess off before you silicon it.
Step 6
Silicon one of the water dishes in the top of your cylinder. This will be the holder for your real water dish. The idea behind this is you have the perfect water dish, plastic that can't be tipped over. Even if they manage it somehow, it won't matter because there will be drainage. If we have to construct a base we may as well take advantage of it. But you can miss out the water dish/cylinder bit if you'd prefer.
Step 7
Construct the sprinkler using the tubing. You can silicon any joins you need to make. Seal the ends. You could just attach the "water-in" hose to one end of the sprinkler tube but in the middle should hopefully be better. Be sure to put the holes in, in such a way as to avoid raining in the water dish. This doesn't matter particularly since you will have drainage but it means the drinking water will always be fresh and not recycled through soil. Having said that, an additional water tank means you can set up a fresh tank to draw from and a used tank to drain to, which avoids water recycling.
It is worth experimenting with where you put the holes, you need to angle them in such as way that they don't spray onto the sides of the tank if possible as this increases the risk of water going down the sides of your base. This doesn't actually matter really because it will fill up and flow inside but we don't really want much free-standing water if we can help it. You also need to experiment with size and number of holes to make the pressure correct.
Step 8
Attach the sprinkler to your lid.
Step 9
Place your gauze/water dish contraption on top of the base (inside the tank).
Step 10
Attach your in and out hoses to the pump. The out hose will have to point downwards so your water container must be located lower than your tanks. It doesn't have to be underneath, at one side will be fine as long as it is lower down.
Step 11
When this is all done, take the nylon material and cut it to the size of the gauze and fit over your dish (and cylinder). This and the gauze will stop soil getting into the water chamber.
A possible solution to this is to line the gauze with a thick layer of sphagnum moss. This will almost certainly work. It will stop the soil getting through but the water will pour out of it when it is full.
Step 12
Turn your pump on to test if it works. Leave it running to make sure there is less coming in than your tank can drain. If that isn't the case, then drill a bigger hole for the exit or another hole and have 2 exit tubes.
Step 13
Add your soil to do a proper test. Leave it running for a few hours and monitor the build up of water. If it rises, you need more drainage from your water chamber or the nylon/gauze bit isn't letting enough water through. If you can't tell which remove the substrate and go back to step 12.
Step 14
The last thing to consider is the volume of water you keep in your main container. If you are happy it is working you can keep it well filled. If not, use a relatively small one so less is going round the system. This will mean it may run dry but if your tank does flood there is nothing to worry about.
Step 15
You'll probably need to increase ventilation as your soil will be soaked after it has rained. This will stop it going sour and help vent any excess moisture off between rainstorms.
Then your done. Stick it on a timer, you can make it rain for as long as you want, as often as you want, without flooding. The water will need replacing when you clean them out and the nylon will need washing probably.
Notes
Obviously this idea will need a few alterations to get it working 100%. If you fancy giving this a whirl, get the essential bits and use a cheap plastic tub. Silicon the out-hose in place rather than building a seal. You can test if it works and adjust your spray without attacking your proper tanks. Also, it may be necessary to increase the soil's drainage. This can be done by adding vermiculite (and possibly perlite if it is safe). This works very well and won't impede the snails ability to burrow. I think the trickiest part after the base build will be balancing the system.
Diagrams
Fig. 1 - Tank Design (Side view)
Fig. 2 - Floor Design
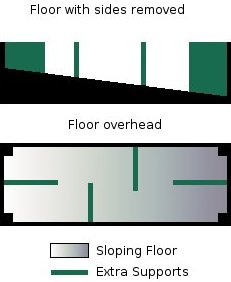
Fig. 3 - Water Out Fitting