From time to time you may experience problems with your snails. Very little is known about what these illnesses are, what causes them, and even less is known about treatments. Unfortunately it seems more time is spent on increasingly more ingenious ways to kill them.
Because of this, the following information is a mix of whatever research is possible and available, theory and hypothesis, logical thinking and the result of various discussions with a large group of snail owners. It is with the help of the community at large, that these problems can at least be documented. Where possible I have tried to link to example incidents.
Hopefully, we can find some effective solutions to the majority of these problems but for now I'm afraid you'll have to be content with various suggestions and discussion.
Broken/Chipped Shell
Snails store calcium that can be utilised when breaks occur. This is often why snails suffering shell damage appear to be uninterested in any calcium supplied. Instead they try to hide to utilise their reserves.
"Wagge has demonstrated the importance of the amoebocytes of Helix in lime transport and shell repair. Calcium carbonate from the diet is stored in protein spheres in special lime cells of the digestive gland, whence it may be released to the lumen from time to time for the regulation of pH of the gut contents. Amoebocytes and alkaline phosphatase are both active in the digestive glands cells and at the site of cell secretion. The amoebocytes have access both to the lime stored in the digestive gland and that laid down in previously secreted parts of the shell. Especially in land pulmonates where lime may be in short supply, repair materials - if not provided with the food - may be withdrawn from elsewhere in the shell. No lime is stored in the secreting edge of the mantle. At a broken part of a shell, amoebocytes densely collect, arranging themselves in a sheet to form a continuous organic membrane, which is then calcified. The mantle epithelium plays little part either in forming the membrane or in laying down the deposit of calcium carbonate" (Molluscs, Morton, J. E, - F.E. 1958, C.E 1968, p.127 - originally surmised from [Wagge, L., 1952. Quart. J. micr. Sci., 92, 307-322 (Shell repair in Helix)])
Chipped Shell Lip

Fig. 1
The newest growth along the shell lip/edge is very fragile and it is not uncommon for it to chip off as shown in Fig. 1. This is nothing to worry about and will be repaired very quickly. You may see the snail rasping the broken edge. This is probably to even it off to promote better and more even new growth.
 Fig. 3
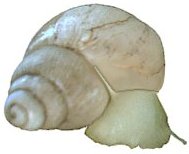 Fig. 2
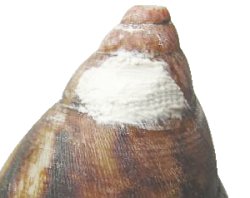
If the shell break looks like that illustrated in Figures 2 and 3, it is likely to have been caused by the snail eating its own shell. Click here for more information.
More Serious Breaks
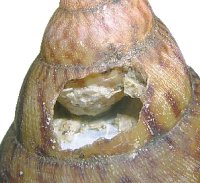 Fig. 4
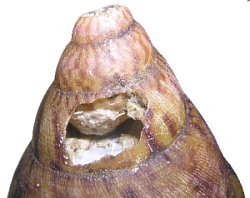
If your snail suffers a more serious break such as the one in Fig. 4 then action is required to stop it drying out as the hole is unlikely to repair properly. In situations where snails have a nasty break, they need to be kept in a humid environment to stop them drying out. It is amazing what kind of breaks snails can survive and repair naturally. There are times when action is needed though and you can repair the break yourself.
The following article explains how: Broken Shell Repair
There are other methods, involving using a piece of egg-shell or epoxy soaked material rather than plaster. What is important is that the break is cleaned properly and that no substance comes in to contact with the snails body. Snails are extremely sensitive to chemicals.
It is also worth mentioning Melafix, an anti-bacterial liquid made from tea-tree oil, that is known to be safe for snails. This could be used to clean any break where you think something bad may have got inside. Please note, it is very strong and should be heavily diluted before use or you may burn your snails. In most cases, clean, sterile water is all that is needed.
Broken Shell Repair
Please note: This is just a guide and my experience. All shell repairs must be undertaken at your own risk.
Quite often a snail suffers a break to its shell. Be it from falling from the tank lid, during transit to you, or from ill treatment before you owned it. A lot of these breaks, especially those at the edge of the shell, will heal themselves with plenty of cuttlefish. But some further down the shell, or when the tip gets broken off may need repairing. I advise you only do this if you can see into the shell and you think the snail is at risk of infection.
Here is the way I have repaired breaks my snails have suffered.
Equipment you will need
- Clean soft baby's toothbrush
- Cooled boiled water
- Plaster of paris
- Cotton buds
- Gauze
- Clean tissue/wipes
- Clear quick dry nail varnish
The Procedure
- Choose a time when your snail is very sleepy, have everything you need in front of you and get your snail out of his tank. First you need to clean all around the area of the break and inside the hole gently with the toothbrush, without poking into it. Keep rinsing with the cooled boiled water.
- Once you are satisfied with it being clean enough you can get ready to fill it. The plaster of paris needs to be made with cooled boiled water and mixed extremely thickly. So its almost a dough but not powdery. This is so that it doesn't run inside the shell to the snails organs.
- If the break is particularly deep, lay a piece of gauze over the hole, just dipping a mm inside, and going onto the shell edge of the break. Paste the plaster of paris over the gauze and just onto the shell edge. You can smooth is out very gently, you don't need that much.
- If the break isn't so deep (where just below is another shell layer but there is distance in between) you can just fill the hole with the plaster of paris and smooth it over very gently.
- Now you have to wait for the plaster to dry, if you made it right it shouldn't run at all. If snail is awake now it might be an idea to give them a rest and a snack, away from other snails that might get at the plaster of paris.
- Once dry, approximately 1 hour. You can begin applying nail varnish over the plaster of paris. This protects the plaster of paris for being chipped or rasped away. Quick dry nail varnish makes this job far easier as you will need to do a few coats. I did 6 with each of mine and thats still untouched.
- Make extra sure the nail varnish is dry before putting your snail down, and back with others. Apart from checking the nail varnish every so often in case its wearing away your snail should now be 'as good as new'.